Why Food Sticks to Stainless Steel Pans (and 8 Ways to Prevent It)
Stainless steel cookware has a reputation for being difficult to cook with. But once you understand why food sticks, you'll discover that getting a beautiful sear without leaving half your dinner behind is easier than you think.
You've got a beautiful stainless steel skillet, a perfectly seasoned chicken breast, and dinner is off to a promising start. Then comes the moment of truth: you try to flip the chicken, and it won't budge.
You give it another tug. Still stuck.
Eventually, you pry it loose, leaving behind a piece of that gorgeous golden crust you were hoping for.
Sound familiar?
Here's something I want every home cook to understand: food sticking to stainless steel doesn't automatically mean you're doing something wrong, and it certainly doesn't mean you need to give up on the pan.
Stainless steel is one of my favorite materials to cook with because it's durable, versatile, and capable of developing the kind of beautiful browning that makes food taste incredible.
But unlike nonstick cookware, stainless steel cookware requires a little more attention to temperature, moisture, and timing.
The good news? Once you understand a few simple principles, you'll spend a lot less time scraping food off your skillet and a lot more time enjoying what's in it.
Affiliate Disclosure: This article may contain affiliate links. If you purchase through these links, Elevated Home Kitchen may earn a small commission at no additional cost to you. I only recommend products that I believe provide genuine value in the home kitchen.
Why Does Food Stick to Stainless Steel?
Let's start with the basics.
Stainless steel might look perfectly smooth, but its surface has tiny irregularities. More importantly, certain foods, especially protein-rich foods like chicken, fish, and eggs, can form temporary bonds with the metal as they cook.
That initial sticking is often a normal part of the cooking process.
As the food browns and develops a crust, those bonds can weaken, allowing it to release more easily.
That's why a chicken breast that seems glued to your skillet after the first minute may lift away with very little effort a few minutes later. The trick is knowing when to leave it alone.
Temperature, surface moisture, the amount of cooking fat, and the type of food all influence how much sticking occurs.
And while stainless steel isn't naturally nonstick, you can make it much more cooperative with the right cooking technique.
1. Start With a Properly Preheated Pan
One of the biggest mistakes home cooks make with stainless steel is adding food before the pan has had a chance to warm up.
When you place chicken or steak into a cold or barely warm skillet, it can stick stubbornly as the pan slowly heats.
For foods you want to sear, a properly preheated skillet helps encourage browning and better release.
Here's the approach I recommend:
Place your empty stainless steel skillet over medium heat.
Allow it to warm gradually for a minute or two, adjusting for the size and thickness of your pan.
Add your cooking oil and swirl it around to coat the cooking surface.
Once the oil looks fluid and begins to shimmer, add your food.
You're looking for a pan that's hot enough to begin cooking the food immediately, but not so hot that the oil smokes heavily.
Chef Take
One misconception that lingers around is that stainless steel must be screaming hot to prevent sticking. That's simply not true.
A properly heated pan is one that's at the right temperature for the food you're cooking.
Chicken thighs and steaks benefit from a hotter surface. Eggs, delicate fish, and butter-based dishes generally need gentler heat.
Learning to control the heat is far more valuable than simply turning the burner up.
For a deeper explanation of how to recognize when your skillet is ready, check out my related article: How to Properly Preheat a Pan (and Why It Makes Such a Difference).
2. Don't Skip the Cooking Fat
Oil and butter do more than add flavor. They also help create a barrier between your food and the metal surface.
Without enough cooking fat, food can make more direct contact with the stainless steel, increasing the likelihood of sticking.
That doesn't mean your food needs to swim in oil.
For most everyday sautéing and searing, a thin, even coating is a good starting point.
However, one interesting outlier to this is duck. Its skin is so thick that I personally never add additional oil.
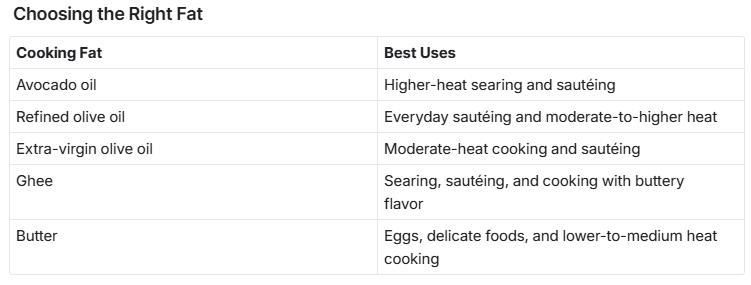
Keep in mind that cooking fats have different smoke points, and the pan temperature should always suit both the ingredient and the fat.
If you're using butter, for example, avoid heating an empty skillet until it's extremely hot before adding it. Butter can burn quickly.
What About Cooking Spray?
Cooking sprays can work in stainless steel, but some contain additives that leave a stubborn residue after repeated high-heat use.
For everyday cooking, I generally prefer a small amount of oil that I can distribute evenly across the skillet.
3. Dry Your Food Before It Hits the Pan
This is one of those small habits that makes a surprisingly big difference.
Imagine placing a damp chicken breast into a hot skillet. Instead of immediately developing that beautiful golden crust, the chicken first has to lose the excess moisture on its surface.
As the water evaporates, it cools the contact area and slows down browning.
That moisture can also make it harder to achieve the crust that eventually helps certain foods release from the pan.
What to Do Instead
Before cooking chicken, steak, pork chops, or fish:
Pat the surface dry with paper towels.
Remove excess moisture from marinades when appropriate.
Avoid adding wet ingredients to a pan when your goal is a hard sear.
Season just before cooking, or salt in advance and dry the surface again if needed.
This doesn't mean every ingredient must be completely dry. Vegetables and foods meant to simmer or steam are different, but when you're looking for a golden-brown sear, surface moisture matters.
4. Stop Moving Your Food Too Soon
Here's where patience becomes your best cooking tool. When you first place a piece of chicken in stainless steel, it may stick.
That's normal. As the surface cooks, proteins change, moisture evaporates, and browning begins.
Once a good crust forms, the chicken often becomes easier to release.
The mistake is trying to flip it before that process has had time to happen.
How to Know When Food Is Ready to Flip
Instead of immediately reaching for your spatula or tongs, watch for a few signs:
The edges of the food are beginning to brown.
The surface touching the pan has developed a golden crust.
A gentle nudge with a thin spatula or tong reveals that the food is beginning to release.
The food lifts without requiring excessive force.
A thin, flexible fish spatula can also make a difference here. Despite its name, I find it useful for more than just fish. Its thin edge slides beneath delicate proteins, making it easier to lift and flip food without tearing apart that beautiful crust you've worked to develop. Just remember, even the best spatula can't make up for trying to flip something before it's ready.
If the chicken is resisting, give it a little more time, provided the heat isn't so high that the crust is burning.
Learning when to leave your food alone is one of those small habits that can make a big difference in your cooking. And it's not the only one. Sometimes, becoming a better cook has less to do with mastering complicated recipes and more to do with the little things you do consistently.
For more simple techniques that can improve your confidence and results in the kitchen, check out my article, 10 Small Cooking Habits That Make You a Better Cook.
5. Avoid Overcrowding the Skillet
You have four chicken breasts to cook, and they all technically fit into your skillet. So why not cook them together?
Because fitting and cooking properly are two different things.
When you overcrowd a pan, the ingredients release moisture into a space that may not have enough heat to evaporate it quickly.
Instead of browning, the food can begin steaming.
You may notice excess liquid collecting in the skillet, pale-looking meat, and uneven browning.
The Better Approach
Leave some breathing room between pieces of food. If necessary, cook in batches.
For example, rather than squeezing four large chicken breasts into a 10-inch skillet, cook two at a time.
Yes, it takes a little longer, but the results are usually worth it.
And if you're cooking several batches, allow the pan to return to the proper temperature before adding the next round.
6. Use the Right Heat for the Right Food
Not everything belongs over medium-high heat.
A stainless steel skillet can produce a gorgeous crust on a steak, but that same temperature may turn scrambled eggs into a stuck-on mess.
Different foods require different approaches.
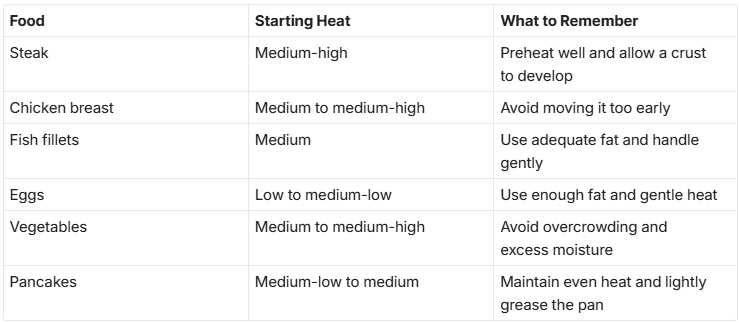
These are starting points, not universal settings. Your stove, cookware, and the thickness of your ingredients will affect the heat you need.
And while getting the outside of your protein beautifully seared is important, don't forget about what's happening on the inside. An instant-read digital thermometer helps take the guesswork out of determining doneness, so you're not sacrificing a perfectly cooked interior just to achieve a beautiful crust.
Chef Take
When I used to teach culinary arts, one of my favorite lessons was teaching students how to properly sear proteins. Not just because it's such an important cooking technique, but because I loved seeing those little “aha!” moments when everything finally clicked.
Maybe it was the first time they seared a steak without burning it, flipped a chicken thigh without leaving half the skin stuck to the pan, or (and this was always the big one) managed to get a beautiful piece of salmon to release from the skillet without turning it into flaked fish.
Those moments were priceless!
More often than not, the issue came down to two things: not allowing the pan to reach the proper temperature and treating every protein as though it required the exact same cooking technique.
Once students understood that a steak, a chicken thigh, and a delicate piece of salmon each needed a slightly different approach to heat and timing, you could practically see their confidence growing.
And that's something I've always emphasized in the kitchen: It's not just about getting your pan hot. It's about knowing how hot it needs to be for what you're cooking, and having the patience to let the food do its thing.
7. Understand the Water-Drop Test (Without Overthinking It)
You've probably seen each phase at some point in your life.
Someone heats a stainless steel skillet, adds a few drops of water, and watches them dance around the surface like little beads of mercury. It looks impressive, but what does it actually tell you?
When water forms little beads that glide around the skillet instead of immediately evaporating, the pan has reached a relatively high temperature.
This can be a useful visual cue when learning how stainless steel responds to heat.
However, there's an important catch. The water-drop test doesn't tell you that your pan is at the perfect temperature for everything you're about to cook.
A skillet hot enough to make water dance may be great for certain searing applications but too hot for eggs, butter, or delicate ingredients.
My advice is to use the test as a learning tool, not a requirement.
For everyday cooking, learning to recognize how your oil behaves, how quickly food begins to sizzle, and how your particular skillet responds to your stove will serve you better.
8. Know When Sticking Is Actually a Good Thing
This might sound strange after everything we've discussed, but sometimes a little sticking is exactly what you want.
When you're searing meat, those browned bits left behind in the skillet are called fond.
Fond is concentrated flavor. It's one of the reasons stainless steel is such a wonderful choice for making pan sauces.
After cooking chicken, for example, you can remove the meat and add a little stock or wine to the skillet.
As the liquid heats, gently scrape the browned bits from the bottom with a wooden spoon or appropriate utensil.
Those flavorful bits dissolve into the liquid, forming the foundation for a delicious sauce.
A Simple Pan Sauce Idea
After searing chicken, reduce the heat, pour off excess fat, and add a splash of chicken stock. Scrape up the browned bits, allow the liquid to reduce slightly, then finish with a small pat of butter.
You now have a quick sauce that tastes like you put considerably more effort into dinner than you actually did.
Chef Take
There's a difference between the beautiful brown bits left behind after searing and the blackened residue from food that has burned.
Brown fond adds depth and richness to sauces.
Black, scorched residue can introduce bitterness.
If the bottom of your pan is turning black or smells burnt, reduce the heat and reassess before adding more ingredients.
Common Stainless Steel Cooking Mistakes (and How to Fix Them)
Here's a quick troubleshooting guide to keep handy.
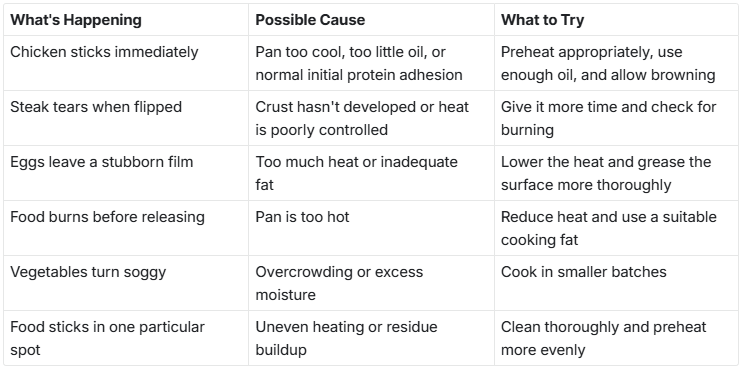
One additional thing worth mentioning: cookware condition matters.
If your stainless steel skillet has a buildup of burned-on oil, cooking residue, or stubborn deposits, even good technique may produce inconsistent results.
Start with a clean cooking surface.
Do You Need Expensive Stainless Steel Cookware to Prevent Sticking?
Not necessarily.
While quality cookware can make temperature management easier, spending hundreds of dollars on a skillet won't automatically solve sticking problems.
What matters more is how the pan is constructed and how you use it.
For example, fully clad stainless steel cookware typically has a conductive core, often aluminum, layered between stainless steel surfaces. This helps distribute heat more evenly across the pan.
Disc-bottom cookware can also perform well, although heat distribution may differ between the base and sidewalls.
A well-made skillet that heats evenly can make cooking more predictable, but technique still matters more than the price tag.
If you're considering upgrading your cookware, a well-constructed stainless steel skillet is a worthwhile investment. Look for one that distributes heat evenly and feels comfortable to handle. You don't need the most expensive pan on the market, just one that performs consistently and suits the way you cook.
Before replacing your cookware, practice preheating, moisture control, and proper timing. You may discover that the pan you already own is perfectly capable of delivering excellent results.
Frequently Asked Questions About Stainless Steel Pans
-
If multiple foods consistently stick, the most likely contributing factors are improper temperature control, insufficient cooking fat, excess surface moisture, or trying to move food too early. Also check that the cooking surface is free of residue.
-
Either approach can work. For many searing applications, I recommend gently preheating the skillet, then adding oil shortly before the food. For delicate cooking, adding oil to a cooler pan and gradually heating both can provide better control. Never leave an empty pan unattended over high heat.
-
Professional cooks rely on heat control, proper cooking fat, dry ingredients, good pan contact, and experience recognizing when food is ready to release. They also choose cookware appropriate for the dish.
-
Yes, but eggs are among the more challenging foods to prepare in stainless steel. Use gentle heat, sufficient butter or oil, and a clean skillet. Some sticking may still occur.
-
No. Unlike seasoned cast iron or carbon steel, stainless steel doesn't normally develop a durable seasoning layer that makes it progressively nonstick. Its performance depends largely on cooking technique and surface condition.
-
Oil helps reduce sticking, but it doesn't eliminate the temporary bonding that can happen between proteins and stainless steel. If the chicken is still firmly attached, it may need more time to brown and release. If it's burning, however, lower the heat rather than continuing to wait.
Final Thoughts: Stainless Steel Is Worth Learning
Stainless steel cookware can be frustrating when you're first learning to use it, especially if you're accustomed to nonstick pans. I don't want you to think of sticking as proof that you're a bad cook.
Often, it's simply feedback.
Your skillet may need a little more time to heat. Your chicken may need another minute before flipping. Or perhaps you've added a little too much food at once.
The more you pay attention to those small details, the more comfortable you'll become. And once you get the hang of it, you'll understand why stainless steel remains a staple in so many professional kitchens.
It's durable, versatile, and capable of creating some truly delicious results.
The goal isn't to make stainless steel behave exactly like nonstick cookware. The goal is to learn how to work with it.
The 30-Second Chef Check
Before you add food to your stainless steel skillet, ask yourself:
Is my skillet properly preheated for what I'm cooking?
Have I added enough oil or butter?
Is the surface of my food reasonably dry?
Have I left enough room in the pan?
Am I prepared to let the food cook without constantly moving it?
Remember: good cooking isn't about memorizing a perfect temperature or following a complicated set of rules. It's about understanding what's happening in your pan and making small adjustments along the way.
Cook with confidence. Cook with intention. Elevate the everyday.
— Elevated Home Kitchen