How to Properly Preheat a Pan: A Chef’s Guide to Better Searing & Less Sticking
You can have a great recipe, quality ingredients, and a beautiful pan, and still end up with pale chicken, soggy vegetables, or half your dinner stuck to the bottom of it.
Sometimes, the problem starts before the food ever hits the pan. You didn’t properly preheat it.
Preheating a pan sounds like one of those tiny cooking details that shouldn’t matter much. But in a professional kitchen, controlling heat is fundamental. The temperature of your pan affects browning, sticking, texture, cooking time, and how evenly your food cooks.
And here's the part many home cooks miss: Preheating doesn’t mean turning the burner to high and waiting until the pan is screaming hot.
The goal is to bring your cookware to the appropriate cooking temperature for the food you're preparing.
Once you learn what to look for, you won't need to stand over the stove wondering, Is this hot enough yet?
Affiliate Disclosure: This post may contain affiliate links. If you purchase through one of these links, I may earn a small commission at no additional cost to you. I only recommend products I genuinely believe can help make cooking at home easier, more efficient, or more enjoyable.
Why Preheating Your Pan Matters
Think about what happens when cold food hits a cold pan. Instead of immediately beginning to sauté or sear, the ingredients slowly warm along with the cookware. Moisture starts escaping before meaningful browning takes place. That can leave you with food that's steaming in its own moisture instead of developing the color and texture you wanted.
A properly heated pan gives you more control from the moment your food touches the cooking surface.
It can help you:
Develop better browning and caramelization
Create a better sear on proteins
Reduce sticking when using cookware such as stainless steel
Cook ingredients more evenly
Prevent vegetables from becoming unnecessarily soggy
Better control how quickly food cooks
This doesn't mean every ingredient needs a blazing-hot pan. Eggs, pancakes, delicate fish, onions, steak, and mushrooms all benefit from different levels of heat. The real skill isn't making the pan hot. It's knowing how hot you need it.
Chef Take
"High heat" and "properly preheated" are not the same thing.
One of the biggest mistakes I see home cooks make is assuming more heat automatically means better cooking. Most of the time, I would rather gradually bring a pan up to temperature and adjust from there than start with a burner cranked all the way up.
You can always add more heat. Recovering from burnt butter, scorched garlic, or an overheated pan is a lot harder.
The Basic Order: Pan → Heat → Fat → Food
For many everyday sautéing and searing applications, especially with stainless steel, seasoned cast iron, and carbon steel, I personally use this general sequence:
1. Put the empty pan on the burner.
2. Turn the burner to the appropriate heat.
Medium is a good starting point for many everyday cooking tasks.
3. Give the pan time to heat evenly.
Depending on the pan, burner, and cooking method, this might take a few minutes.
4. Add your cooking fat.
Add your oil and swirl it around the pan.
5. Watch the oil.
As it heats, the oil becomes thinner and flows more easily across the cooking surface. For many sautéing and searing applications, you're looking for a shimmer, not smoke.
6. Add your food.
Now you're ready to cook.
One important exception is nonstick cookware, particularly ceramic nonstick. Manufacturer instructions can differ, and some specifically advise against heating the cookware while empty. Always follow the care instructions for your particular pan.
How Do You Know When a Pan Is Hot Enough?
This is where cooking becomes less about following a timer and more about learning to read your pan.
I repeat... Watch the Oil
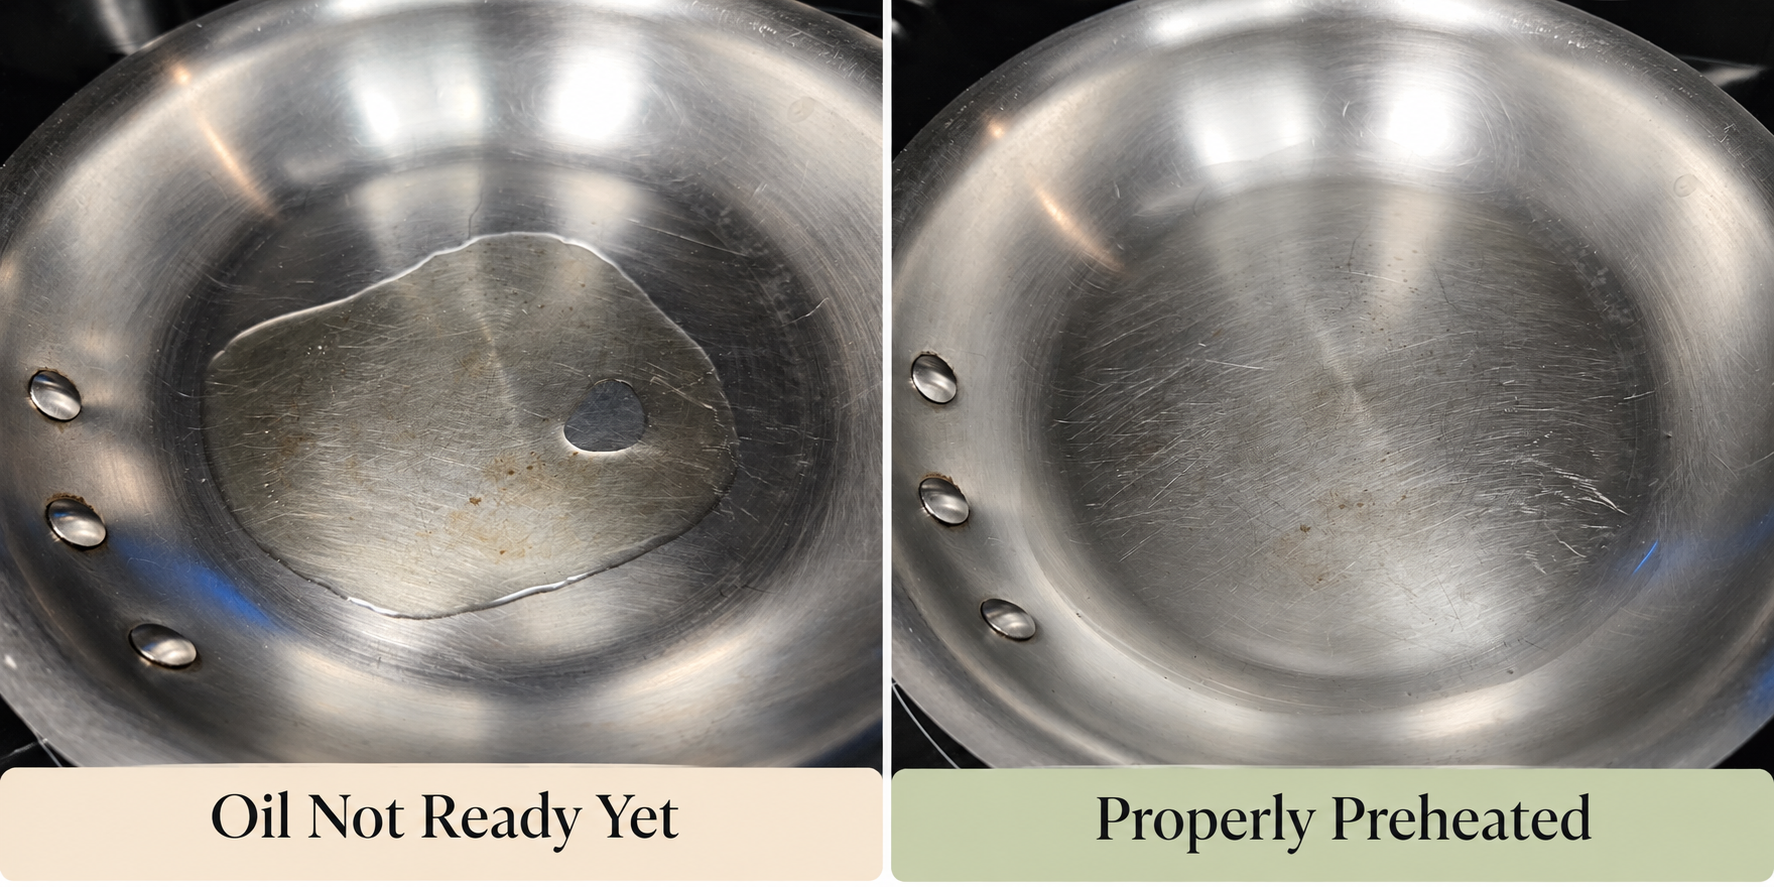
Not ready vs. ready to cook: As oil heats, it becomes thinner and moves more easily across the pan. Learning to recognize these visual cues can help you achieve better browning, improved searing, and less sticking.
Once oil is added to a properly heated pan, it should loosen almost immediately.
Tilt the pan. The oil should glide easily across the cooking surface rather than sitting in one thick puddle. You may also notice the surface beginning to shimmer. That's generally a good indication you're approaching sautéing or searing territory.
If Your Oil Is Smoking...
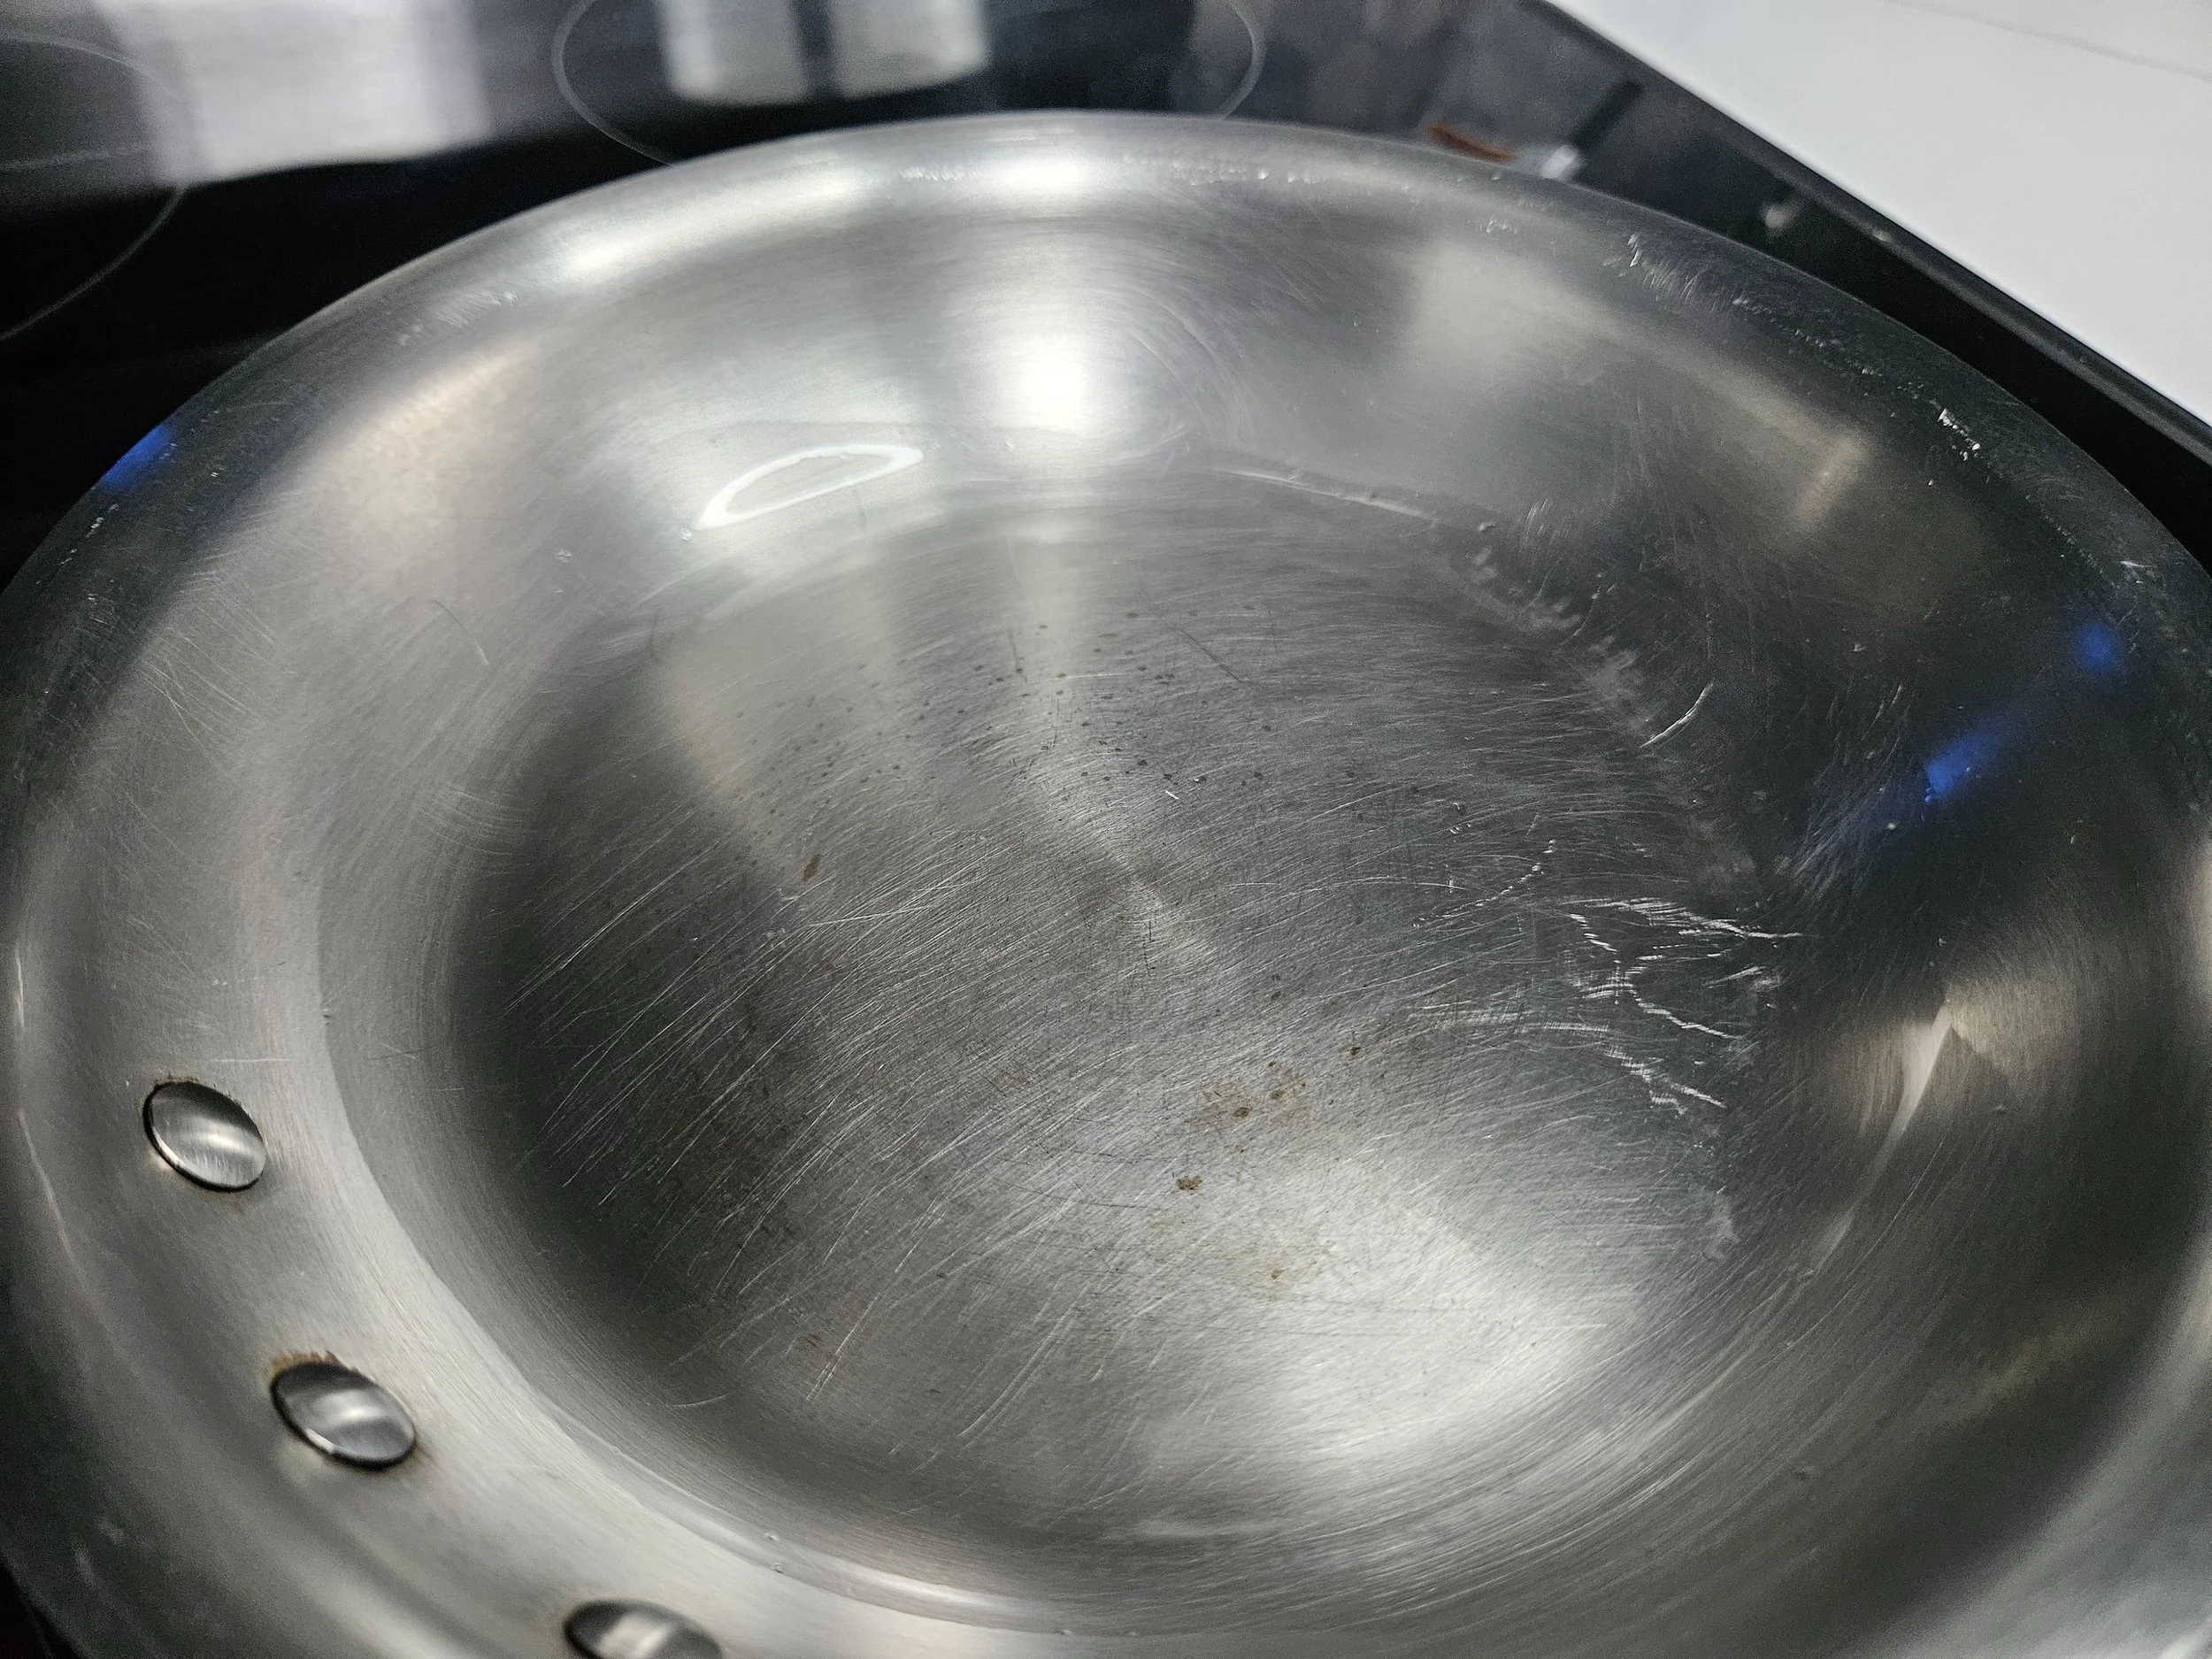
You've probably gone too far. Remove the pan from the burner briefly and lower the heat.
Smoking oil isn't the goal. It's your pan telling you that you've exceeded the useful cooking range of that particular fat.
Listen When the Food Hits the Pan
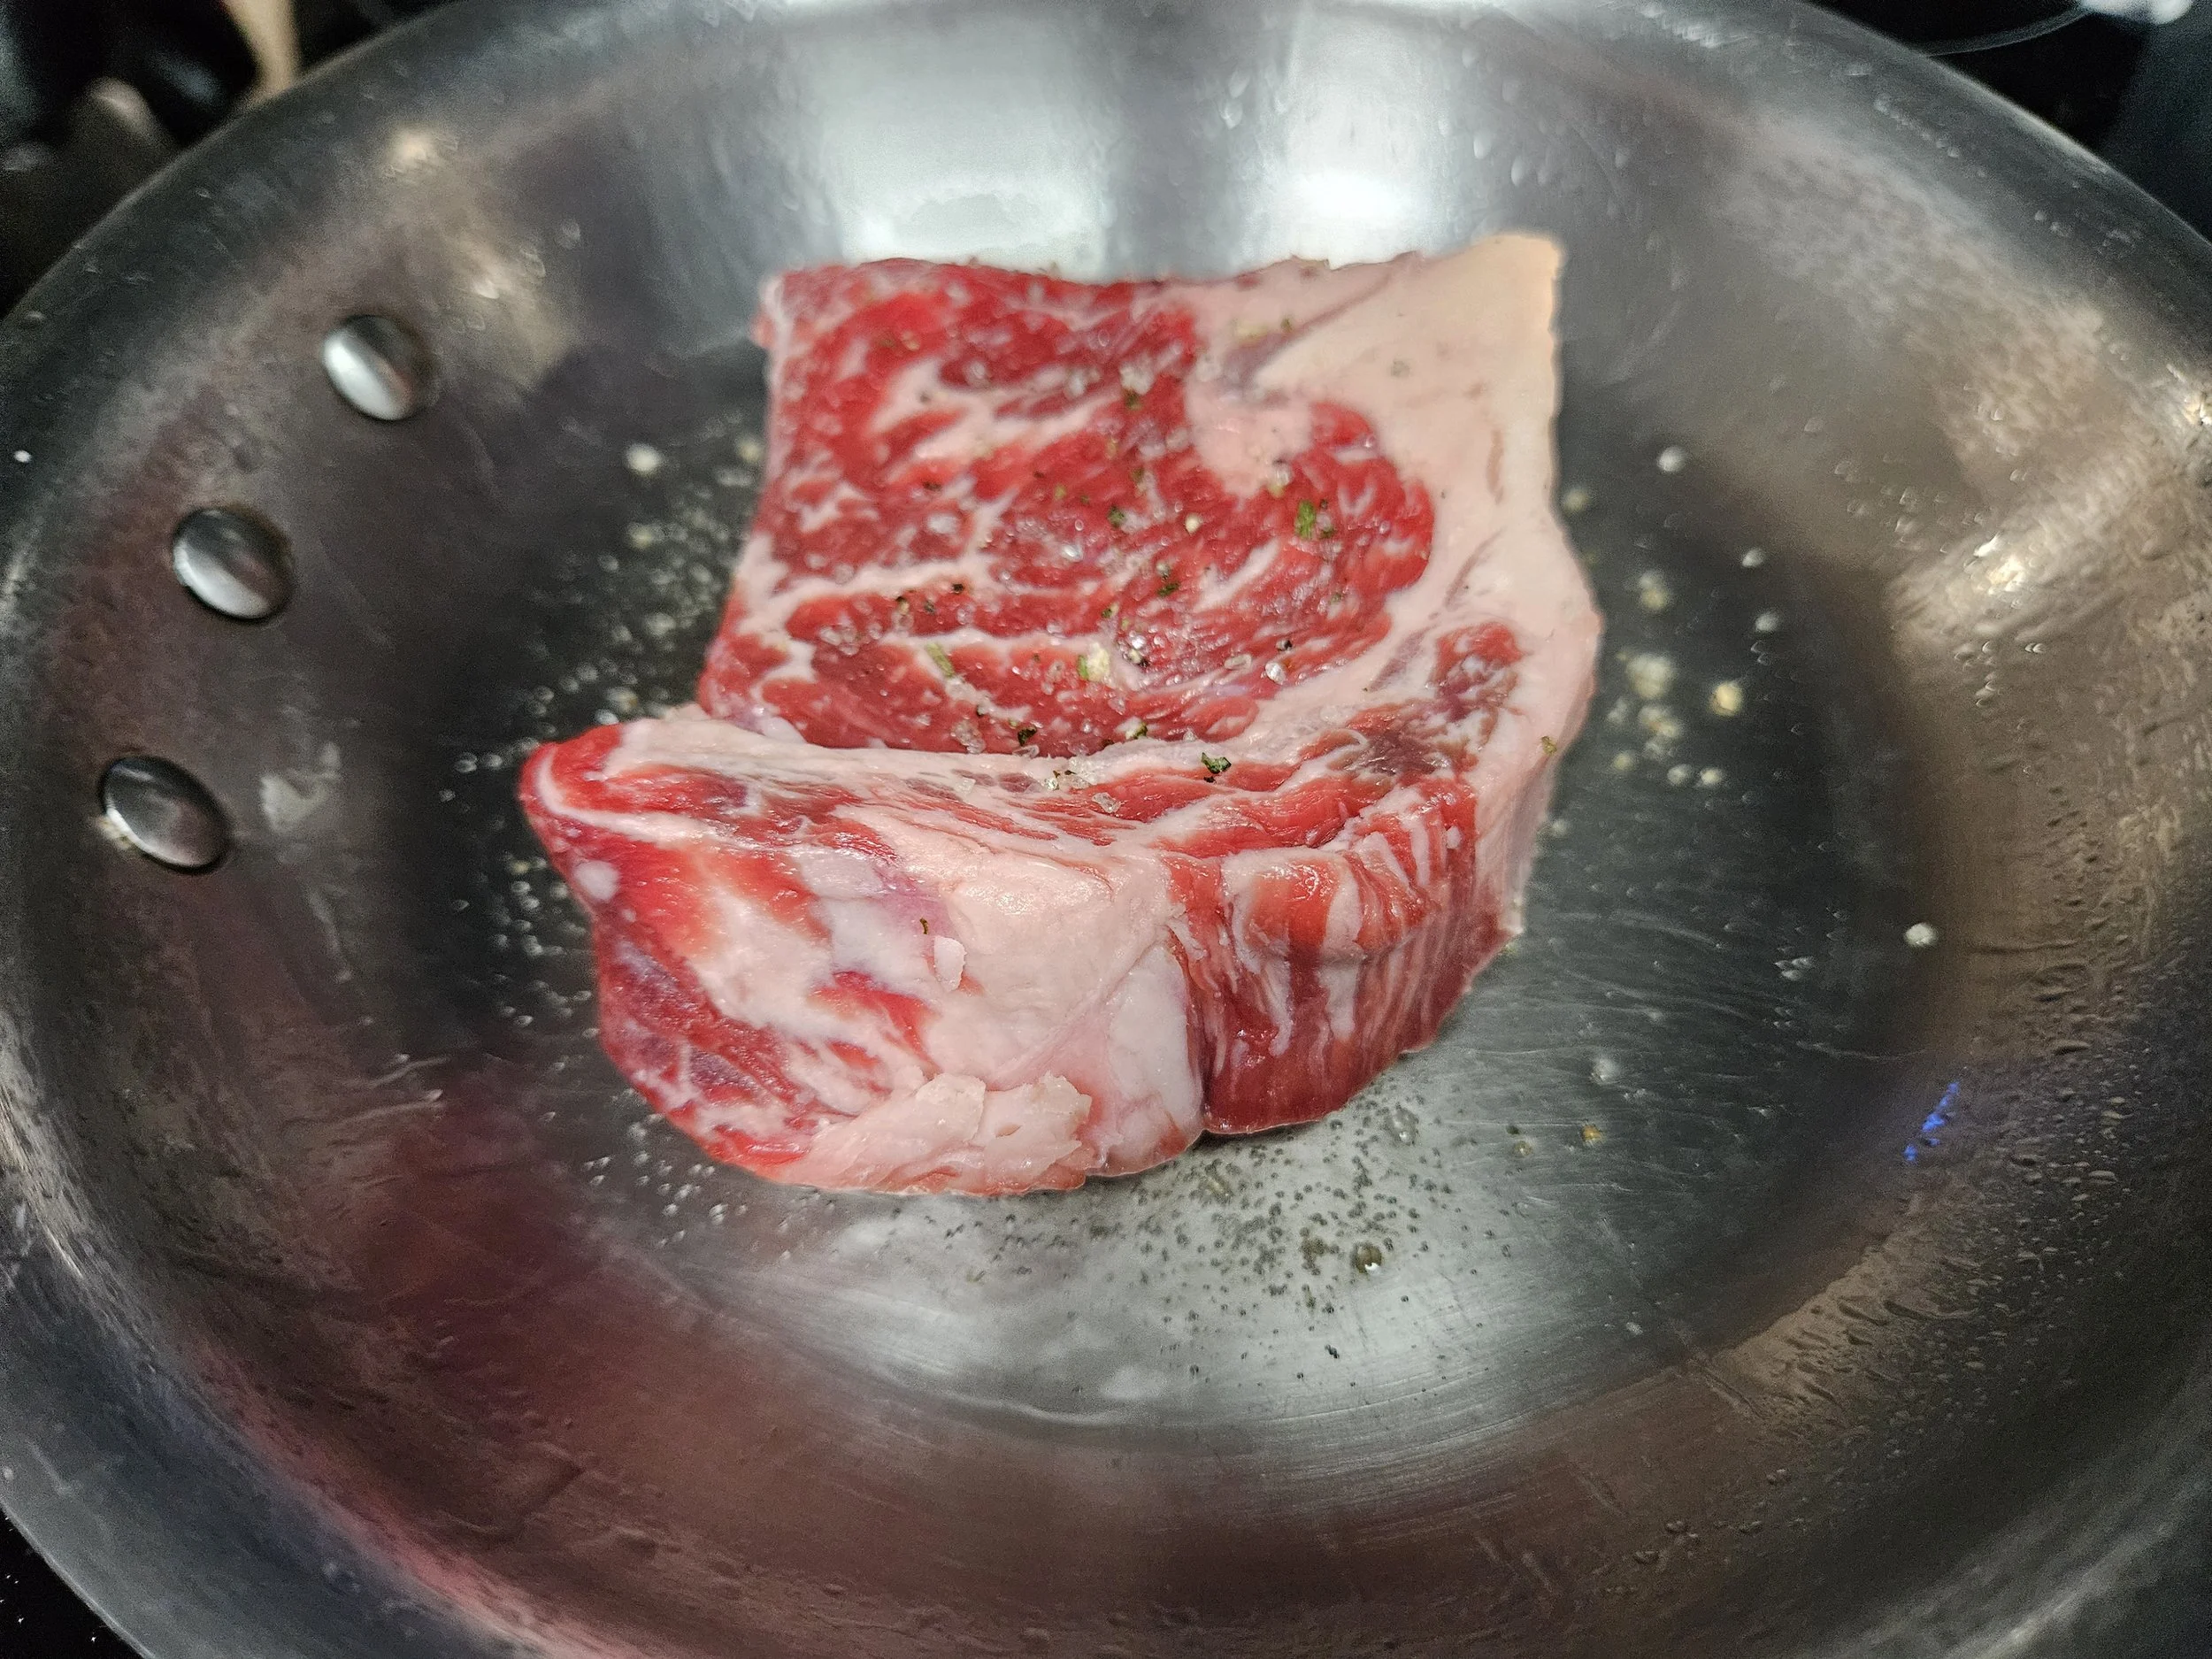
Your ears are another cooking tool.
Food intended for sautéing or searing should generally give you an immediate, controlled: Sssssssss.
Not silence nor a violent eruption of oil. You're looking for active cooking without chaos.
What About the Water-Drop Test?
You've probably seen this little trick floating around online, especially when people are cooking with stainless steel.
The idea is pretty simple: A few drops of water can help you figure out whether your pan is hot enough.
Here's how it works:
Place your stainless-steel pan over medium heat and let it warm up for a couple of minutes.
Add a few drops of water to the pan.
Watch what happens!
If the water just sits there and slowly bubbles:
Your pan is still warming up.
If the water immediately sizzles and disappears:
The pan is getting hotter, but it hasn't reached the dancing-water stage yet.
If the water forms little balls that glide or "dance" around the pan:
You've reached a higher temperature that's often useful when preparing to sear food.
Pretty neat, right?
But here's something I want you to keep in mind: Just because your pan passes the water-drop test doesn't mean it's the right temperature for everything you're cooking.
That level of heat might work beautifully when you're searing a steak or chicken, but it could be way too hot for scrambled eggs, butter, or delicate ingredients.
And remember, this trick is mainly for uncoated stainless-steel pans. It's not something you need to do with nonstick cookware.
My advice? Use the water-drop test as a helpful starting point while you're getting comfortable with stainless steel. Over time, you'll get better at recognizing when your pan is ready just by watching your oil, listening for that sizzle, and paying attention to how your food cooks.
Chef Take
Your food should determine your pan temperature, not TikTok.
If I'm searing a steak, I want considerably more heat than if I'm cooking scrambled eggs. Learning that distinction is much more valuable than memorizing one trick for deciding whether every pan is "ready."
Preheating Different Types of Pans
This is where things get important because not every pan should be treated the same way.
Stainless Steel
Stainless steel benefits tremendously from proper preheating.
Start around medium heat and allow the pan to warm gradually. For many stainless-steel pans, a couple of minutes is enough to begin checking the temperature.
If you're sautéing or searing:
Preheat → test your heat → add oil → add food.
Proper heat management is also one of the keys to reducing sticking in stainless steel. Made In, for example, recommends preheating its stainless-clad cookware over medium heat for roughly 2–3 minutes before using its water test and adding oil.
Best for: meat, poultry, vegetables, mushrooms, pan sauces, sautéing and searing.
Cast Iron
Cast iron takes longer to heat, but it also retains heat exceptionally well. That means patience pays off.
Instead of blasting your skillet over high heat, allow it to gradually warm over medium-low to medium heat. Lodge recommends gradually preheating cast iron and notes that its heat retention means you often don't need settings above medium.
Depending on your cookware and stove, several minutes may be necessary for the entire cooking surface to heat evenly.
Once it's hot, remember: Cast iron holds onto that heat. You may actually need to turn the burner down after the initial preheat.
Best for: steaks, burgers, chicken, cornbread, vegetables and foods where strong heat retention is useful.
Carbon Steel
Think of carbon steel as somewhere between stainless steel and cast iron.
It responds to temperature changes more quickly than heavy cast iron but can still develop excellent heat retention and searing ability.
Gradually bring it up to temperature rather than immediately blasting it with maximum heat.
Best for: searing, sautéing, eggs once well-seasoned, vegetables, and high-heat cooking.
Traditional Nonstick
This is where I want you to forget the idea that every pan needs to get crazy hot.
Nonstick cookware generally performs best at low to medium heat.
All-Clad, for example, instructs users of its hard-anodized nonstick cookware to cook over low or medium heat, avoid overheating empty cookware, and treat smoking fat as a sign that the pan is too hot. Your specific manufacturer's instructions should always take priority.
Best for: eggs, pancakes, delicate fish, and foods that don't require aggressive browning.
Ceramic Nonstick
Ceramic-coated cookware deserves its own mention because care instructions may specifically tell you not to preheat the pan empty.
For example, All-Clad recommends adding butter or oil while its ceramic nonstick pans preheat and using low-to-medium heat.
So if you're using ceramic-coated cookware, check the manufacturer's directions before using the empty-pan method.
Enameled Cast Iron
Don't automatically treat enameled cast iron like bare cast iron.
For stovetop use, some manufacturers advise against preheating enameled cookware while completely empty. Lodge, for example, recommends having water or oil in its enameled cast iron while it warms and starting over low heat. Again, your cookware manufacturer's instructions win here.
Match the Heat to the Food
Instead of asking:
"How hot should my pan be?"
Ask:
"What am I trying to accomplish?"
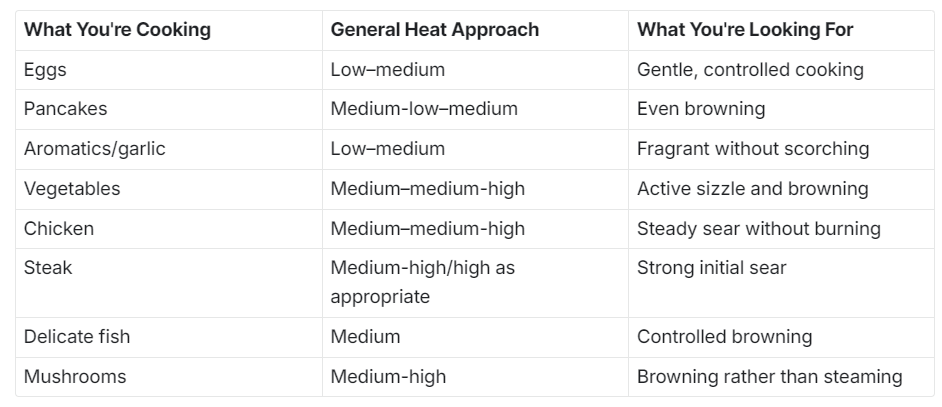
These are starting points, not absolute burner settings.
Your stove, cookware, pan size, ingredient temperature, and amount of food all affect how much heat you'll actually need.
Don't Crowd the Pan
You can perfectly preheat your skillet and still lose your sear in five seconds.
How? Put too much food in it.
Every ingredient you add absorbs heat from the pan. Add a couple of chicken thighs and the pan temperature drops a little.
Pile six cold chicken thighs into a small skillet and the temperature can drop dramatically. What's happening? Moisture is beginning to accumulate faster than it can evaporate.
Instead of:
Sear → brown → delicious
you get:
Steam → gray → watery
Give your ingredients room, and if necessary, cook in batches.
Chef Take
A preheated pan isn't permanently hot. The moment food goes into the pan, you're changing its temperature.
Good cooking isn't just about reaching the right temperature initially. It's about managing heat throughout the cooking process. If the sizzle suddenly disappears after you add your ingredients, pay attention. Your pan is telling you something.
Five Common Pan-Preheating Mistakes
-
High heat isn't a shortcut for preheating. Gradual heating gives you more control and can be gentler on cookware.
-
A pan can move from ready to overheated surprisingly quickly, especially with responsive cookware.
-
Shimmering oil can be useful. Smoking oil generally means you've gone beyond where you wanted to be.
-
Stainless steel, cast iron, carbon steel, ceramic, and traditional nonstick behave differently.
-
You can properly preheat the pan and immediately undo your work by overcrowding it.
Should You Add Oil Before or After Preheating?
The answer is: It depends on the cookware.
For stainless steel, seasoned cast iron, and carbon steel, I generally prefer:
Pan → Heat → Oil → Food
It gives you better control over both the pan temperature and cooking fat.
For certain nonstick, ceramic, and enameled cookware, manufacturer instructions may recommend adding oil or another ingredient before or during preheating instead of heating the cookware completely empty.
That's why learning your cookware matters.
What About Butter?
Butter is delicious, but it isn't my first choice for aggressively preheating a pan. Its milk solids can brown and eventually burn.
For higher-temperature cooking, I'll often start with an appropriate cooking oil and add butter later for flavor.
For lower-temperature foods, like eggs, starting with butter can actually be helpful because it gives you a visual clue about the pan's temperature.
If the butter melts gently and foams, you're in a very different temperature zone than butter that immediately browns and smokes.
Learn to read those clues. That's cooking.
The 30-Second Chef Check
Before your food goes into the pan, take 30 seconds and ask:
What pan am I using?
Stainless? Cast iron? Carbon steel? Nonstick?
What am I trying to accomplish?
Gentle cooking? Sautéing? Browning? Hard sear?
Does the pan need to preheat empty?
Check the manufacturer's instructions if you're using coated or enameled cookware.
What is my oil doing?
For sautéing and searing, it should generally move freely and shimmer—not smoke.
What happens when the food hits the pan?
Listen for an immediate, controlled sizzle.
If those five things line up, start cooking.
The Bottom Line
Properly preheating a pan isn't about following a rigid two-minute rule or getting every skillet as hot as possible. It's about heat control.
Once you start paying attention to how your cookware heats, how your oil behaves, how food sounds when it hits the pan, and how quickly the pan recovers after ingredients are added, you'll start relying less on recipes telling you exactly what burner setting to use. And that's one of those small shifts that makes you a much better cook.
Heat the pan with intention. Add the fat at the right time. Listen for the sizzle. Then adjust as you cook.
That's the difference between simply turning on the stove and actually controlling the pan.
Learning to control your pan temperature is one of those small kitchen habits that dramatically improve your cooking over time.